Setting up the SonarQube scanner when building a .NET Core container image
Just show me the code
As always if you don’t care about the post I have upload the source code on my Github.
SonarQube is one of the most well-known code review tools in the dotnet space. It is used mainly to detect bugs, vulnerabilities and code smells in your codebase and it can be integrated with any workflow to enable a continuous code inspection across multiple branches and pull requests.
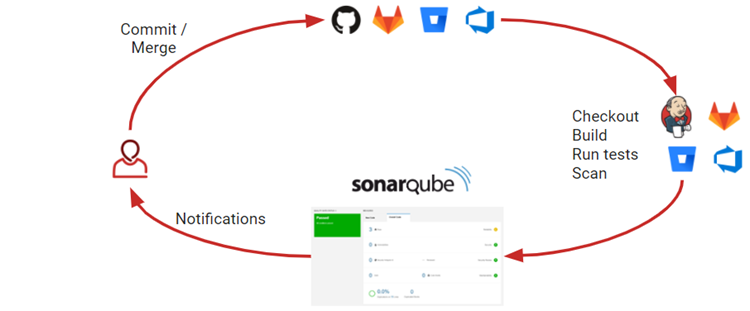
In a typical development process:
- A Developer checks-in their code to their CVS (control version system).
- The organization continuous integration tool checks out the code, builds, runs the tests and afterwards an integrated SonarQube scanner analyzes the results.
- The SonarQube scanner posts the results to the SonarQube server which provides feedback to developers through the SonarQube UI.
To analyze your code you need to install and configure a SonarQube scanner. The scanner can either run on your build or as part of your continuous integration pipeline performing a scan whenever your build process is triggered.
If you’re using containers quite probably you’re doing the build, test and analysis steps inside the Dockerfile, and setting up the SonarQube scanner when building the image can be a little more cumbersome than usual, and that’s why I wanted to write a little bit about it.
Prerequisites
- A running SonarQube server instance.
I’m not going to talk about how to set up a SonarQube server because it is out of the scope for this post, you can use either a SonarCloud instance or spun your own Sonarqube server.
For this post I’ll be using a SonarCloud instance mainly because it is faster to set it up and it is free for public projects.
Building the Dockerfile
A good practice when writing a dockerfile is using multi-stage builds.
A multi-stage build allow you to drastically reduce the size of your final image, without struggling to reduce the number of intermediate layers and files.
With multi-stage builds, you use multiple FROM statements in your Dockerfile. Each FROM instruction can use a different base, and each of them begins a new stage of the build. You can selectively copy artifacts from one stage to another, leaving behind everything you don’t want in the final image.
These are the steps we’re going to do in each stage:
-
Stage 1
- Install Java.
- Install the
dotnet-sonarscannerglobal tool. - Install the
dotnet-reportgenerator-globaltoolglobal tool. - Start the SonarQube scanner.
- Restore the dependencies.
- Build the app.
- Run the tests.
- Get the code coverage report from the tests and convert it into a SonarQube report.
- Publish the app.
- Stop the SonarQube scanner.
-
Stage 2
- Get the artifact from the stage 1.
- Execute the run command.
Here’s how the final Dockerfile looks like:
#############
## Stage 1 ##
#############
FROM mcr.microsoft.com/dotnet/sdk:5.0-buster-slim AS build-env
WORKDIR /app

## Arguments for setting the Sonarqube Token and the Project Key
ARG SONAR_TOKEN
ARG SONAR_PRJ_KEY

## Setting the Sonarqube Organization and Uri
ENV SONAR_ORG "karlospn"
ENV SONAR_HOST "https://sonarcloud.io"

## Install Java, because the sonarscanner needs it.
RUN mkdir /usr/share/man/man1/
RUN apt-get update && apt-get dist-upgrade -y && apt-get install -y openjdk-11-jre

## Install sonarscanner
RUN dotnet tool install --global dotnet-sonarscanner --version 5.3.1

## Install report generator
RUN dotnet tool install --global dotnet-reportgenerator-globaltool --version 4.8.12

## Set the dotnet tools folder in the PATH env variable
ENV PATH="${PATH}:/root/.dotnet/tools"

## Start scanner
RUN dotnet sonarscanner begin \
	/o:"$SONAR_ORG" \
	/k:"$SONAR_PRJ_KEY" \
	/d:sonar.host.url="$SONAR_HOST" \
	/d:sonar.login="$SONAR_TOKEN" \
	/d:sonar.coverageReportPaths="coverage/SonarQube.xml"

## Copy the applications .csproj
COPY /src/WebApp/*.csproj ./src/WebApp/

## Restore packages
RUN dotnet restore "./src/WebApp/WebApp.csproj" -s "https://api.nuget.org/v3/index.json"

## Copy everything else
COPY . ./

## Build the app
RUN dotnet build "./src/WebApp/WebApp.csproj" -c Release --no-restore

## Run dotnet test setting the output on the /coverage folder
RUN dotnet test test/WebApp.Tests/*.csproj --collect:"XPlat Code Coverage" --results-directory ./coverage

## Create the code coverage file in sonarqube format using the cobertura file generated from the dotnet test command
RUN reportgenerator "-reports:./coverage/*/coverage.cobertura.xml" "-targetdir:coverage" "-reporttypes:SonarQube"

## Publish the app
RUN dotnet publish src/WebApp/*.csproj -c Release -o /app/publish --no-build --no-restore

## Stop scanner
RUN dotnet sonarscanner end /d:sonar.login="$SONAR_TOKEN"

#############
## Stage 2 ##
#############
FROM mcr.microsoft.com/dotnet/aspnet:5.0-buster-slim
WORKDIR /app
COPY --from=build-env /app/publish .
ENTRYPOINT ["dotnet", "WebApp.dll"]
Now let me explain bit by bit what the Dockerfile is doing.
- Step 1: Define which arguments should be passed at runtime and which not.
## Arguments for setting the Sonarqube Token and the Project Key
ARG SONAR_TOKEN
ARG SONAR_PRJ_KEY

## Setting the Sonarqube Organization and Uri
ENV SONAR_ORG "karlospn"
ENV SONAR_HOST "https://sonarcloud.io"
The "SONAR_TOKEN" argument contains the SonarQube server credentials, so it should not be hardcoded into the Dockerfile.
The "SONAR_PRJ_KEY argument contains the project key name.
The "SONAR_ORG" and SONAR_HOST parameters don’t contain sensitive data and are not going to change so I can set both of them as environment variables.
- Step 2: Install Java.
## Install Java, because the sonarscanner needs it.
RUN mkdir /usr/share/man/man1/
RUN apt-get update && apt-get dist-upgrade -y && apt-get install -y openjdk-11-jre
This is a must, because the sonar scanner won’t work without it.
I’m using mcr.microsoft.com/dotnet/sdk:5.0-buster-slim as a base image, this image is based on Debian 10 and if you try to install a Java Runtime Environment package, you’ ll get this error:
Errors were encountered while processing:
 openjdk-11-jre-headless:amd64
 openjdk-11-jre:amd64
 default-jre
E: Sub-process /usr/bin/dpkg returned an error code (1)
To fix the issue you need execute the command mkdir -p /usr/share/man/man1. It seems that java packages require that folder to exist. Installing the man package doesn’t fix the issue, you need to create the folder manually.
- Step 3: Install
dotnet-sonarscanneranddotnet-reportgenerator-globaltool
## Install sonarscanner
RUN dotnet tool install --global dotnet-sonarscanner --version 5.3.1

## Install report generator
RUN dotnet tool install --global dotnet-reportgenerator-globaltool --version 4.8.12

## Set the dotnet tools folder in the PATH env variable
ENV PATH="${PATH}:/root/.dotnet/tools"
The dotnet-sonarscanner global tool is the recommended way to launch an analysis for projects using the dotnet command line as a build tool.
The dotnet-reportgenerator-globaltool global tool converts coverage reports generated by coverlet, OpenCover, dotCover, Visual Studio, NCover, Cobertura, JaCoCo, Clover, gcov or lcov into another formats, and one of this formats is the SonarQube format.
- Step 4: Start Sonar Scanner.
## Start scanner
RUN dotnet sonarscanner begin \
        /o:"$SONAR_ORG" \
        /k:"$SONAR_PRJ_KEY" \
        /d:sonar.host.url="$SONAR_HOST" \
        /d:sonar.login="$SONAR_TOKEN" \
        /d:sonar.coverageReportPaths="coverage/SonarQube.xml"
The coverageReportPaths attribute needs to point to the code coverage report. (More info on Step 6)
- Step 5: Copy the
.csprojfiles, restore, build and run the tests.
## Copy the applications .csproj
COPY /src/WebApp/*.csproj ./src/WebApp/

## Restore packages
RUN dotnet restore "./src/WebApp/WebApp.csproj" -s "https://api.nuget.org/v3/index.json"

## Copy everything else
COPY . ./

## Build the app
RUN dotnet build "./src/WebApp/WebApp.csproj" -c Release --no-restore

## Run dotnet test setting the output on the /coverage folder
RUN dotnet test test/WebApp.Tests/*.csproj --collect:"XPlat Code Coverage" --results-directory ./coverage
When running the dotnet test command you need to specify the “XPlat Code Coverage” argument, this argument is a friendly name that enables the Coverlet data collector and it will output a coverage.cobertura.xml file in the results-directory folder.
As an alternative, you could use the MSBuild package if your build system already makes use of MSBuild. In this case you need run the tests using the dotnet test/WebApp.Tests/*.csproj /p:CollectCoverage=true /p:CoverletOutputFormat=cobertura command
- Step 6: Generate the code coverage report in a format compatible for SonarQube.
## Create the code coverage file in sonarqube format using the cobertura file generated from the dotnet test command
RUN reportgenerator "-reports:./coverage/*/coverage.cobertura.xml" "-targetdir:coverage" "-reporttypes:SonarQube"
The code coverage file generated by the dotnet test command is not compatible with SonarQube, with the report generator tool we’re converting the Coverlet code coverage report into a compatible SonarQube report.
The targetdir attribute specifies the folder where the resulting report will be placed.
- Step 7: Publish the application and stop the SonarQube scanner
## Publish the app
RUN dotnet publish src/WebApp/*.csproj -c Release -o /app/publish --no-build --no-restore

## Stop scanner
RUN dotnet sonarscanner end /d:sonar.login="$SONAR_TOKEN"
- Step 8: Get the artifact from the stage 1 and execute the run command.
#############
## Stage 2 ##
#############
FROM mcr.microsoft.com/dotnet/aspnet:5.0-buster-slim
WORKDIR /app
COPY --from=build-env /app/publish .
ENTRYPOINT ["dotnet", "WebApp.dll"]