Testing how to use some container vulnerabilities scanners with Azure Pipelines
Just show me the code
As always if you don’t care about the post I have upload the source code on my Github.
A big part of any organization’s risk assessment process is to be aware of and gain visibility into vulnerabilities in the software being used. Vulnerability scanning allows us to review the security state of the container images and take actions to fix issues identified during the scan, resulting in more secure deployments.
One of the main challenges a development team face is how to manage container security risk without slowing down application delivery. A way to address this early is by adopting a Secure DevOps workflow.
Image scanning is a key function of a Secure DevOps workflow. Image scanning refers to the process of analyzing the contents of a container image in order to detect security issues, vulnerabilities or bad practices.
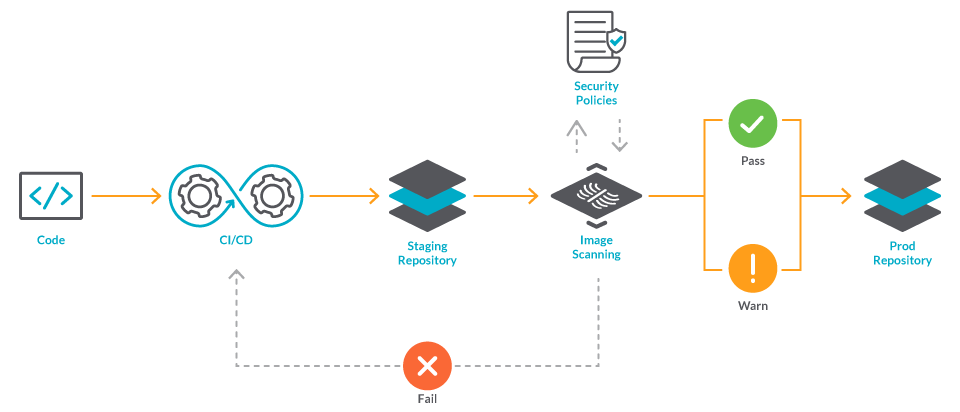
Image scanning is easy to implement and automate and in this post I will be covering how you can use some of the most well-known scanners alongside with your Azure DevOps CI/CD YAML Pipelines.
Right now on the market there are a ton of great choices when you want to use a container vulnerability scanner. Snyk, Clair, Qualys, Sysdig or Trivy are some of the most well-known.
In this post I’ll be focusing on those 4 image scanners:
- AWS Elastic Container Registry integrated scanner featuring Clair.
- Azure Defender for ACR scan featuring Qualys.
- Sysdig
- AquaSec Trivy.
1- AWS Elastic Container Registry integrated scanner featuring Clair
Elastic Container Register (ECR) is a fully managed container registry offered by AWS, it uses the Common Vulnerabilities and Exposures (CVEs) database from the open-source Clair project.
You can manually scan container images stored in ECR or you can configure your repositories to scan images when you push them to a repository, that might be an issue for some companies because in a secure DevOps workflow you might want to scan the image BEFORE pushing it into the registry. In that case you have 2 options available:
- Option 1: Run another security scanner like Trivy or Sysdig before pushing the image to ECR. If you’re interested in this option, go to section 3 or section 4.
- Option 2: After pushing the image, get the security report from ECR and if there are any vulnerabilities delete the image.
Here’s a code snippet showing how you can achieve “Option 2” using Azure YAML Pipelines:
trigger:
  branches:
    include:
    - master
  paths:
    exclude:
    - pipelines/*
    - test/*
    - README.md
    - .dockerignore
    - .gitignore

variables:
- name: appName
  value: 'ScanApp'
- name: tag
  value: '$(Build.BuildId)'
- name: awsCredentials
  value: 'aws-dev'
- name: awsRegion
  value: 'eu-west-1'
- name: awsAccount
  value: '9433277812'

pool:
  vmImage: 'ubuntu-latest'

steps:
- task: Bash@3
  displayName: Create application image
  inputs:
    targetType: 'inline'
    script: |
      docker build -t  ${{ lower(variables.appName) }}:$(tag) .
    workingDirectory: '$(System.DefaultWorkingDirectory)'

- task: AWSShellScript@1
  displayName: Create ECR repository
  inputs:
    awsCredentials: '$(awsCredentials)'
    regionName: '$(awsRegion)'
    scriptType: 'inline'
    inlineScript: |
      aws ecr describe-repositories --repository-names ${{ lower(variables.appName) }} || aws ecr create-repository --repository-name ${{ lower(variables.appName) }} --image-scanning-configuration scanOnPush=true
- task: AWSShellScript@1
  displayName: Push image to ECR repository
  inputs:
    awsCredentials: '$(awsCredentials)'
    regionName: '$(awsRegion)'
    scriptType: 'inline'
    inlineScript: |
      aws ecr get-login-password --region $(awsRegion) | docker login --username AWS --password-stdin $(awsAccount).dkr.ecr.$(awsRegion).amazonaws.com
      docker tag ${{ lower(variables.appName) }}:$(tag)  $(awsAccount).dkr.ecr.$(awsRegion).amazonaws.com/${{ lower(variables.appName) }}:$(tag)
      docker push $(awsAccount).dkr.ecr.$(awsRegion).amazonaws.com/${{ lower(variables.appName) }}:$(tag)

- task: AWSShellScript@1
  displayName: Check security vulnerabilities
  inputs:
    awsCredentials: '$(awsCredentials)'
    regionName: '$(awsRegion)'
    scriptType: 'inline'
    inlineScript: |
      aws ecr wait image-scan-complete --repository-name ${{ lower(variables.appName) }} --image-id imageTag=$(tag)
      SCAN_FINDINGS=$(aws ecr describe-image-scan-findings --repository-name ${{ lower(variables.appName) }} --image-id imageTag=$(tag) | jq '.imageScanFindings.findingSeverityCounts')
      CRITICAL=$(echo $SCAN_FINDINGS | jq '.CRITICAL')
      HIGH=$(echo $SCAN_FINDINGS | jq '.HIGH')
      MEDIUM=$(echo $SCAN_FINDINGS | jq '.MEDIUM')
      LOW=$(echo $SCAN_FINDINGS | jq '.LOW')
      INFORMATIONAL=$(echo $SCAN_FINDINGS | jq '.INFORMATIONAL')
      UNDEFINED=$(echo $SCAN_FINDINGS | jq '.UNDEFINED')
      if [ $CRITICAL != null ]; then
        echo Docker image contains vulnerabilities at CRITICAL level. The image will be deleted.
        aws ecr batch-delete-image --repository-name ${{ lower(variables.appName) }} --image-ids imageTag=$(tag)
        exit 1;
      fi
      if [ $HIGH != null ]; then
        echo Docker image contains vulnerabilities at HIGH level. The image will be deleted.
        aws ecr batch-delete-image --repository-name ${{ lower(variables.appName) }} --image-ids imageTag=$(tag)
        exit 1;
      fi
      if [ $MEDIUM != null || $LOW != null || $INFORMATIONAL != null ]; then
        echo Docker image contains medium or lower vulnerabilities.
      fi
Let’s review what the pipeline is doing.
- Create the image of your app.
- task: Bash@3
  displayName: Create application image
  inputs:
    targetType: 'inline'
    script: |
      docker build -t  ${{ lower(variables.appName) }}:$(tag) .
    workingDirectory: '$(System.DefaultWorkingDirectory)'
- Create the ECR repository if it doesn’t exist.
When creating the ECR repository it is very important setting the attribute scanOnPush=true.
If scanOnPush is enabled, images are scanned after being pushed. If scanOnPush is disabled on a repository, then you must manually start each image scan to get the scan results.
- task: AWSShellScript@1
  displayName: Create ECR repository
  inputs:
    awsCredentials: '$(awsCredentials)'
    regionName: '$(awsRegion)'
    scriptType: 'inline'
    inlineScript: |
      aws ecr describe-repositories --repository-names ${{ lower(variables.appName) }} || aws ecr create-repository --repository-name ${{ lower(variables.appName) }} --image-scanning-configuration scanOnPush=true
- Push the image to ECR
- task: AWSShellScript@1
  displayName: Push image to ECR repository
  inputs:
    awsCredentials: '$(awsCredentials)'
    regionName: '$(awsRegion)'
    scriptType: 'inline'
    inlineScript: |
      aws ecr get-login-password --region $(awsRegion) | docker login --username AWS --password-stdin $(awsAccount).dkr.ecr.$(awsRegion).amazonaws.com
      docker tag ${{ lower(variables.appName) }}:$(tag)  $(awsAccount).dkr.ecr.$(awsRegion).amazonaws.com/${{ lower(variables.appName) }}:$(tag)
      docker push $(awsAccount).dkr.ecr.$(awsRegion).amazonaws.com/${{ lower(variables.appName) }}:$(tag)
- Analyze the scan results.
The aws ecr wait image-scan-complete command waits until the image scan is complete and findings can be accessed, it will poll every 5 seconds until a successful state has been reached or will exit with a return code of 255 after 60 failed checks.
After retrieving and parsing the scanner results, the script checks for HIGH or CRITICAL vulnerabilities and if there are any, it deletes the image from ECR and breaks the pipeline execution.
If the scripts finds only MEDIUM, LOW or INFORMATIONAL vulnerabilities continues the execution.
I didn’t write the script used to check the vulnerabilities, I’m using a script from Sahan Ruwanga Gunathilaka post, so kudos to him.
- task: AWSShellScript@1
  displayName: Check security vulnerabilities
  inputs:
    awsCredentials: '$(awsCredentials)'
    regionName: '$(awsRegion)'
    scriptType: 'inline'
    inlineScript: |
      aws ecr wait image-scan-complete --repository-name ${{ lower(variables.appName) }} --image-id imageTag=$(tag)
      SCAN_FINDINGS=$(aws ecr describe-image-scan-findings --repository-name ${{ lower(variables.appName) }} --image-id imageTag=$(tag) | jq '.imageScanFindings.findingSeverityCounts')
      CRITICAL=$(echo $SCAN_FINDINGS | jq '.CRITICAL')
      HIGH=$(echo $SCAN_FINDINGS | jq '.HIGH')
      MEDIUM=$(echo $SCAN_FINDINGS | jq '.MEDIUM')
      LOW=$(echo $SCAN_FINDINGS | jq '.LOW')
      INFORMATIONAL=$(echo $SCAN_FINDINGS | jq '.INFORMATIONAL')
      UNDEFINED=$(echo $SCAN_FINDINGS | jq '.UNDEFINED')
      if [ $CRITICAL != null ]; then
        echo Docker image contains vulnerabilities at CRITICAL level. The image will be deleted.
        aws ecr batch-delete-image --repository-name ${{ lower(variables.appName) }} --image-ids imageTag=$(tag)
        exit 1;
      fi
      if [ $HIGH != null ]; then
        echo Docker image contains vulnerabilities at HIGH level. The image will be deleted.
        aws ecr batch-delete-image --repository-name ${{ lower(variables.appName) }} --image-ids imageTag=$(tag)
        exit 1;
      fi
      if [ $MEDIUM != null || $LOW != null || $INFORMATIONAL != null ]; then
        echo Docker image contains medium or lower vulnerabilities.
      fi
2- Azure Defender for ACR scan featuring Qualys
Azure Container Registry (ACR) is a managed, private Docker registry service for storing container images.
If you plan to use the image vulnerability scanning capabilities, you’ll need to enable Azure Defender for container registries at the subscription level. The scanner is powered by Qualys.
Azure Defender works exactly like AWS ECR, that means that it will only scan the images when they’re pushed to the registry.
With AWS ECR we had to build a script that fetch and analyze the scanning results, but in this case Microsoft has already built it, so you can just copy-paste it and you are good to go.
You can find it in the following link
I grabbed the Azure Pipeline and the script built by Microsoft and made some slight modifications.
Here’s how it looks:
trigger:
  branches:
    include:
    - master
  paths:
    exclude:
    - pipelines/*
    - test/*
    - README.md
    - .dockerignore
    - .gitignore

pool:
  vmImage: "ubuntu-latest"

variables:
  - name: registryName
    value: 'acrcponsndev'
  - name: imageName
    value: 'app-example-vulnerabilities'
  - name: azureSubscription
    value: 'service-endpoint-cpons-dev'
  - name: tag
    value: '$(Build.BuildId)'
  - name: waitForScanResultsAfterPushInMinutes
    value: '5'

stages:
- stage: Build_and_Publish
  displayName: Build and push image to registry than check for vulnerability scan results to determine publishing health
  jobs:
  - job: BuildAndPush
    displayName: BuildAndPush
    pool:
      vmImage: 'ubuntu-latest'
    steps:
    - task: AzureCLI@2
      displayName: AZ ACR Login
      inputs:
        azureSubscription: $(azureSubscription)
        scriptType: 'bash'
        scriptLocation: 'inlineScript'
        inlineScript: 'az acr login --name $(registryName)'
    - task: AzureCLI@2
      displayName: AZ ACR Build
      inputs:
        azureSubscription: $(azureSubscription)
        scriptType: 'bash'
        scriptLocation: 'inlineScript'
        inlineScript: 'az acr build -t $(imageName):$(tag) -t $(imageName):latest -r $(registryName) -f Dockerfile .'
        useGlobalConfig: true
        workingDirectory: '$(Build.SourcesDirectory)'

  - job: WaitForScanResults
    displayName: Wait for scan results
    pool: 'Server'
    dependsOn:
    - BuildAndPush
    steps:
    - task: Delay@1
      inputs:
        delayForMinutes: '$(waitForScanResultsAfterPushInMinutes)'

  - job: ImageScanCheck
    displayName: Check for image vulnerabilities
    pool:
      vmImage: 'ubuntu-latest'
    dependsOn:
    - BuildAndPush
    - WaitForScanResults
    steps:
      - task: AzureCLI@2
        inputs:
          azureSubscription: $(azureSubscription)
          scriptType: 'pscore'
          scriptLocation: 'scriptPath'
          scriptPath: '$(Build.SourcesDirectory)/acr-image-scan.ps1'
          arguments: '-registryName $(registryName) -repository $(imageName) -tag $(tag)'
This pipeline is using multiple jobs because the Delay@1 task is an agentless task and on a single job you can’t mix steps that requires an agent with step that don’t.
Let’s make a quick review about the steps involved in this pipeline.
- Build and push the image into ACR.
The az acr build command creates a container image, tags it, and pushes it to the registry. It does all those steps with just a single command.
To be able to push the image to ACR we need to log in first, and that’s exactly what we’re doing with the az acr login command.
  - job: BuildAndPush
    displayName: BuildAndPush
    pool:
      vmImage: 'ubuntu-latest'
    steps:
    - task: AzureCLI@2
      displayName: AZ ACR Login
      inputs:
        azureSubscription: $(azureSubscription)
        scriptType: 'bash'
        scriptLocation: 'inlineScript'
        inlineScript: 'az acr login --name $(registryName)'
    - task: AzureCLI@2
      displayName: AZ ACR Build
      inputs:
        azureSubscription: $(azureSubscription)
        scriptType: 'bash'
        scriptLocation: 'inlineScript'
        inlineScript: 'az acr build -t $(imageName):$(tag) -t $(imageName):latest -r $(registryName) -f Dockerfile .'
        useGlobalConfig: true
        workingDirectory: '$(Build.SourcesDirectory)'
- Stop the pipeline a fixed period of time.
The delay task is stopping the pipeline execution a fixed amount of time because the vulnerability scan takes a few minutes to complete. This step is needed to ensure that the results are available and we can can continue on.
  - job: WaitForScanResults
    displayName: Wait for scan results
    pool: 'Server'
    dependsOn:
    - BuildAndPush
    steps:
    - task: Delay@1
      inputs:
        delayForMinutes: '$(waitForScanResultsAfterPushInMinutes)'
- Get the scan results and analyze them
Invoke the script that fetches the scan result and assess the vulnerabilities.
  - job: ImageScanCheck
    displayName: Check for image vulnerabilities
    pool:
      vmImage: 'ubuntu-latest'
    dependsOn:
    - BuildAndPush
    - WaitForScanResults
    steps:
      - task: AzureCLI@2
        inputs:
          azureSubscription: $(azureSubscription)
          scriptType: 'pscore'
          scriptLocation: 'scriptPath'
          scriptPath: '$(Build.SourcesDirectory)/acr-image-scan.ps1'
          arguments: '-registryName $(registryName) -repository $(imageName) -tag $(tag)'
I decided to not touch this script at all, because it is good enough as it is. But, let’s review it out anyways.
<#
.SYNOPSIS
  Automation script to include ASC vulnerability assessment scan summary for provided image as a gate.
  Check result and assess whether to pass security gate by findings severity.

.DESCRIPTION
  Azure secuirty center (ASC) scan Azure container registry (ACR) images for known vulnerabilities on multiple scenarios including image push.
 (https://docs.microsoft.com/en-us/azure/security-center/defender-for-container-registries-introduction#when-are-images-scanned)
  Using this tool you can have a security gate as part of image release(push) or
  deployment to cluster to check if for image there is existent scan in ASC (for example part following push) - retry ,
  And assess it's findings by configurable thresholds to decide whether to fail the gate - i.e the release/deployment.
  Script extracts provided ACR image digest, try to extract ASC scan summary using Azure resource graph AZ CLI module and check if result is healthy or not.
  If Healthy, will exit gate successfully, otherwise if unhealthy,
  Check for any high findings or medium findings count suppress their thresholds to fail the gate, otherwise will set gate in warning mode.
  In case there's a major vulnerability in image, gate(script) will fail to allow exit in CI/CD pipelines.


.PARAMETER registryName
  [mandatory]
  Azure container registry resource name image is stored.
.PARAMETER repository
  [mandatory]
  It can be any EXISTING resource group, using the ASC default "DefaultResourceGroup-XXX" is one option.
  Note: Since the ASC VA solution is not an Azure resource it will not be listed under the resource group, but still it is attached to it.
.PARAMETER tag
  [mandatory]
  The name of the new solution
.PARAMETER scanExtractionRetryCount
  [optional]
  Max retries to get image scan summary from ASC. (Useful for waiting for scan result to finish following image push).
.PARAMETER mediumFindingsCountFailThreshold
  [optional]
  Threshold to fail gate on Medium severity findings count in scan (default is 5)
  ** In the case of High servirty finging gate will always fail.**
.PARAMETER lowFindingsCountFailThreshold
  [optional]
  Threshold to fail gate on Low severity findings count in scan (default is 15)
  ** In the case of High servirty finging gate will always fail.**


.EXAMPLE
	.\ImageScanSummaryAssessmentGate.ps1 -registryName <registryResourceName> -repository <respository> -tag <tag>
.EXAMPLE
	.\ImageScanSummaryAssessmentGate.ps1 -registryName tomerregistry -repository build -tag latest

.NOTES
   AUTHOR: Tomer Weinberger - Software Engineer at Microsoft Azure Security Center
#>

# Prerequisites
# Azure CLI installed
# Optional: Azure CLI Resource Grpah extension installed (installed as part of script)
Param(
	# Image registry name
	[Parameter(Mandatory=$true)]
	$registryName,

	# Image repository name in registry
   	[Parameter(Mandatory=$true)]
	$repository,

	# Image tag
   	[Parameter(Mandatory=$true)]
	$tag,

	# Max retries to get image scan summary from ASC.
	$scanExtractionRetryCount = 3,

	# Medium servrity findings failure threshold
	$mediumFindingsCountFailThreshold = 5,

	# Low servrity findings failure threshold
	$lowFindingsCountFailThreshold = 15
)

az extension add --name resource-graph -y

$imageDigest = az acr repository show -n $registryName --image "$($repository):$($tag)" -o tsv --query digest
if(!$imageDigest)
{
	Write-Error "Image '$($repository):$($tag)' was not found! (Registry: $registryName)"
	exit 1
}

Write-Host "Image Digest: $imageDigest"

# All images scan summary ARG query.
$query = "securityresources
 | where type == 'microsoft.security/assessments/subassessments'
 | where id matches regex  '(.+?)/providers/Microsoft.ContainerRegistry/registries/(.+)/providers/Microsoft.Security/assessments/dbd0cb49-b563-45e7-9724-889e799fa648/'
 | extend registryResourceId = tostring(split(id, '/providers/Microsoft.Security/assessments/')[0])
 | extend registryResourceName = tostring(split(registryResourceId, '/providers/Microsoft.ContainerRegistry/registries/')[1])
 | extend imageDigest = tostring(properties.additionalData.imageDigest)
 | extend repository = tostring(properties.additionalData.repositoryName)
 | extend scanFindingSeverity = tostring(properties.status.severity), scanStatus = tostring(properties.status.code)
 | summarize scanFindingSeverityCount = count() by scanFindingSeverity, scanStatus, registryResourceId, registryResourceName, repository, imageDigest
 | summarize  severitySummary = make_bag(pack(scanFindingSeverity, scanFindingSeverityCount)) by registryResourceId, registryResourceName, repository, imageDigest, scanStatus"

# Add filter to get scan summary for specific provided image
$filter = "| where imageDigest =~ '$imagedigest' and repository =~ '$repository' and registryResourceName =~ '$registryname'"
$query  = @($query, $filter) | out-string

Write-Host "Query: $query"

# Remove query's new line to use ARG CLI
$query = $query -replace [Environment]::NewLine,"" -replace "`r`n","" -replace "`n",""

# Get result wit retry policy
$i = 0
while(($result = az graph query -q $query -o json | ConvertFrom-Json).count -eq 0 -and ($i = $i + 1) -lt $scanExtractionRetryCount)
{
	Write-Host "No results for image $($repository):$($tag) yet ..."
	Start-Sleep -s 20
}

if(!$result -or $result.count -eq 0)
{
	Write-Error "No results were found for digest: $imageDigest after $scanExtractionRetryCount retries!"
	exit 1
}

# # Extract scan summary from result
$scansummary = $result.data[0]
Write-Host "Scan summary: $($scansummary | out-string)"

if($scansummary.scanstatus -eq "healthy")
{
  Write-Host "Healthy scan result, no major vulnerabilities  found in image"
}
elseif($scansummary.scanstatus -eq "unhealthy")
{
	# Check if there are major vulnerabilities  found - customize by parameters
	if($scansummary.severitysummary.high -gt 0 `
	-or $scansummary.severitysummary.medium -gt $mediumFindingsCountFailThreshold `
	-or $scansummary.severitysummary.low -gt $lowFindingsCountFailThreshold)
	{
	   Write-Error "Unhealthy scan result, major vulnerabilities  found in image summary"
	}
	else
	{
		Write-Warning "Unhealthy scan result, some vulnerabilities  found in image"
	}
}
else
{
	Write-Error "Unknown scan result returned"
}
The script is using the Azure Resource Graph to query Azure Security Center to obtain the vulnerability scan results.
Azure Resource Graph is a service in Azure that is designed to extend ARM by providing the ability to query across a given set of subscriptions.
To use it, you must have at least read access to the resources you want to query. Without at least read permissions to the Azure object or object group, results won’t be returned.
If you’re curious about using
Azure Resource Graphto query ASC, the following link has a bunch of sample queries: https://docs.microsoft.com/en-us/azure/security-center/resource-graph-samples?tabs=azure-cli
After obtaining the scan results from ARG, the script checks if the status of the scan is unhealthy and if so, it breaks the pipeline execution using the Write-Error command.
3- Sysdig
Sysdig is a SaaS (Software-as-a-Service) platform. It is built on an OSS stack that includes Falco and sysdig OSS.
It provides a stand-alone inline scanner that can perform local analysis on container images and post the result of the analysis to the SaaS backend.
The Sysdig inline scanner works as an independent container, without any Docker dependency, and can analyze images using different image formats and sources.
When the inline scanner has completed the image analysis, it sends the metadata to the Sysdig SaaS to perform a “policy evaluation” step.
A policy is a combination of rules and actions that should be taken if the policy rule is breached.
Here’s a code snippet showing how you can run the Sysdig inline scanner with Azure Pipelines:
trigger:
  branches:
    include:
    - master
  paths:
    exclude:
    - pipelines/*
    - test/*
    - README.md
    - .dockerignore
    - .gitignore

variables:
- name: appName
  value: 'ScanApp'
- name: tag
  value: '$(Build.BuildId)'


pool:
  vmImage: 'ubuntu-latest'

steps:
- task: Bash@3
  displayName: Create application image
  inputs:
    targetType: 'inline'
    script: |
      docker build -t  ${{ lower(variables.appName) }}:$(tag) .
    workingDirectory: '$(System.DefaultWorkingDirectory)'
- task: Bash@3
  displayName: Check vulnerabilities
  inputs:
    targetType: 'inline'
    script: |
      docker run --rm \
        -v /var/run/docker.sock:/var/run/docker.sock \
        sysdiglabs/secure-inline-scan:2 \
        --sysdig-url $(SYSDIG_URL) \
        --sysdig-token $(SYSDIG_API_TOKEN) \
        --storage-type docker-daemon \
        --storage-path /var/run/docker.sock \
        ${{ lower(variables.appName) }}:$(tag)
As you can see, it is a pretty straightforward pipeline, but anyways let’s review the steps.
- Create the image of your app.
- task: Bash@3
  displayName: Create application image
  inputs:
    targetType: 'inline'
    script: |
      docker build -t  ${{ lower(variables.appName) }}:$(tag) .
    workingDirectory: '$(System.DefaultWorkingDirectory)'
- Run the Sysdig secure-inline-scan container image.
When running the scanner there are multiple execution possibilities available:
- Scan a local image build (
storage-type="docker-daemon) - Scan a image tarball (
storage-type="docker-archive) - Scan a OCI tarball (
storage-type="oci-archive) - Scan a OCI directory (
storage-type="oci-dir)
In the previous step we built a docker image, so we’re going to choose to scan a local image build, which means that the storage-type attribute needs to be set to docker-daemon.
Also when scanning a local image build, as in our case, mounting the host Docker socket is required.
The sysdig-token is a token from the Sysdig API that can be retrieved from the SaaS itself, and the sysdig-url is the url of your Sysdig instance.
- task: Bash@3
  displayName: Check vulnerabilities
  inputs:
    targetType: 'inline'
    script: |
      docker run --rm \
        -v /var/run/docker.sock:/var/run/docker.sock \
        sysdiglabs/secure-inline-scan:2 \
        --sysdig-url $(SYSDIG_URL) \
        --sysdig-token $(SYSDIG_API_TOKEN) \
        --storage-type docker-daemon \
        --storage-path /var/run/docker.sock \
        ${{ lower(variables.appName) }}:$(tag)
When the inline scanner has completed the image analysis, it will send the result to the Sysdig SaaS to perform the policy evaluation step.
If the Policy evaluation fails the pipeline will break, otherwise the pipeline will go on and now you can add an extra step that pushes the image into your trusted repository.
4- AquaSec Trivy
Trivy is an OSS vulnerability scanner for containers and other artifacts, using it with Azure Pipelines it’s really simple and straightforward.
Here’s a code snippet showing how you can run the Trivy scanner with Azure Pipelines:
trigger:
  branches:
    include:
    - master
  paths:
    exclude:
    - pipelines/*
    - test/*
    - README.md
    - .dockerignore
    - .gitignore

variables:
- name: appName
  value: 'ScanApp'
- name: tag
  value: '$(Build.BuildId)'

pool:
  vmImage: 'ubuntu-latest'

steps:
- task: Bash@3
  displayName: Create application image
  inputs:
    targetType: 'inline'
    script: |
      docker build -t  ${{ lower(variables.appName) }}:$(tag) .
    workingDirectory: '$(System.DefaultWorkingDirectory)'
- task: Bash@3
  displayName: Download Trivy Scanner
  inputs:
    targetType: 'inline'
    script: |
      curl -sfL https://raw.githubusercontent.com/aquasecurity/trivy/main/contrib/install.sh | sh -s -- -b /usr/local/bin
- task: Bash@3
  displayName: Scan image
  inputs:
    targetType: 'inline'
    script: |
      trivy --exit-code 0 --severity LOW,MEDIUM,HIGH --no-progress ${{ lower(variables.appName) }}:$(tag)
      trivy --exit-code 1 --severity CRITICAL --no-progress ${{ lower(variables.appName) }}:$(tag)
Let’s review the pipeline steps.
- Create the image of your app.
- task: Bash@3
  displayName: Create application image
  inputs:
    targetType: 'inline'
    script: |
      docker build -t  ${{ lower(variables.appName) }}:$(tag) .
    workingDirectory: '$(System.DefaultWorkingDirectory)'
- Download and install the scanner.
- task: Bash@3
  displayName: Download Trivy Scanner
  inputs:
    targetType: 'inline'
    script: |
      curl -sfL https://raw.githubusercontent.com/aquasecurity/trivy/main/contrib/install.sh | sh -s -- -b /usr/local/bin
- Run the scanner.
By default, Trivy exits with code 0 even when vulnerabilities are detected. Use the --exit-code option if you want to exit with a non-zero exit code.
In this step the scan will ran twice, but it will break the pipeline with an exit code 1 only when a critical vulnerability is found.
- task: Bash@3
  displayName: Scan image
  inputs:
    targetType: 'inline'
    script: |
      trivy --exit-code 0 --severity LOW,MEDIUM,HIGH --no-progress ${{ lower(variables.appName) }}:$(tag)
      trivy --exit-code 1 --severity CRITICAL --no-progress ${{ lower(variables.appName) }}:$(tag)
As I stated before if the scanner finds any critical vulnerability the script will exit with an exit code 1 and the pipeline will break, otherwise the pipeline will go on and now you can add another step to push the image into your trusted repository.
Useful links
- https://docs.microsoft.com/en-us/azure/security-center/defender-for-container-registries-introduction
- https://techcommunity.microsoft.com/t5/azure-security-center/enhance-your-ci-cd-deployment-by-using-vulnerability-assessments/ba-p/2102516
- https://medium.com/@sahangunathilaka/scan-docker-images-in-amazon-ecr-and-retrieve-scan-findings-e5a3fe4e7afa
- https://www.winopsdba.com/blog/azure-cloud-container-build-scan-publish.html
- https://github.com/Azure/Azure-Security-Center/tree/main/Container%20Image%20Scan%20Vulnerability%20Assessment
- https://docs.sysdig.com/en/docs/sysdig-secure/scanning/integrate-with-cicd-tools/