How to deploy a SignalR Core application to AWS
Once every full moon I get asked by someone that wants to deploy a SignalR Core app on AWS, and usually the questions are more in line with wanting to know about which AWS services should they use to have a functional SignalR Core app on AWS. Some of the questions are along these lines:
- Can I use this service to deploy my SignalR app?
- Should I deploy my app on a Windows VM? Can I use a Linux VM?
- Can I use an API Gateway in front of my SignalR application?
- How a load balancer should be configured to work properly with WebSockets?
- I need to scale out the SignalR app, which AWS service should I use for the backplane?
- Can I use the Azure SignalR Service if my application is hosted on AWS?
I usually find that there is a gap of knowledge when trying to deploy a SignalR Core app on AWS, so in this post I’m going to talk a little bit about which AWS services can be used and how to set them up properly when you want to deploy a SignalR Core application to AWS.
Network
In this first section I want to talk about AWS services that controls and balances network traffic and how to use them with SignalR Core.
The services we’re going to review are the following ones:
- AWS Application Load Balancer
- AWS WebSocket Api Gateway
1. AWS Application Load Balancer
There are 2 things worth mentioning when setting up an AWS ALB: WebSockets and Sticky Sessions.
WebSockets
The ALB allows us to forward the traffic to an application by leveraging a couple of resources:
- A Target Group.
- A Listener.
The Target Group defines where to send the traffic. We can configure the port and protocol of the traffic that is forwarded, as well as a health check, so that the load balancer doesn’t send traffic to a dead service.
The Listener defines how the load balancer gets its traffic from outside. That’s where you define the port and the protocol to reach the load balancer, and what is the default behavior for the traffic hitting that listener.
Amazon ALB Listeners only offer HTTP or HTTPS protocol, but the good news is that WebSocket initially contacts the server with HTTP if you use ws:// or HTTPS if you use wss://.
Your server will then reply with 101 Switching Protocols, telling the client to upgrade to a WebSocket connection and from this point forward the communication will be via WebSocket.
SignalR uses the WebSocket transport where available and falls back to older transports where necessary.
You don’t need to do any extra configuration on the ALB to start using WebSockets, but it’s good to know how it works.
Sticky sessions
SignalR requires that all HTTP requests for a specific connection be handled by the same instance. When a SignalR app is running behind a load balancer with multiple instances of the same service, sticky sessions must be used.
The only circumstances in which sticky sessions are not required are:
- When hosting on a single instance of the application.
- When using the Azure SignalR Service (later we’ll talk a little bit about it).
- When all clients are configured to only use WebSockets.
The next code snippet shows an example of a CDK app that creates an ALB Target Group with sticky sesion enabled.
new ApplicationTargetGroup(this,
    "tg-app-ecs-signalr-core-demo",
    new ApplicationTargetGroupProps
    {
        TargetGroupName = "tg-app-ecs-signalr-core-demo",
        Vpc = vpc,
        TargetType = TargetType.IP,
        ProtocolVersion = ApplicationProtocolVersion.HTTP1,
        StickinessCookieDuration = Duration.Days(1),
        HealthCheck = new HealthCheck
        {
            Protocol = Amazon.CDK.AWS.ElasticLoadBalancingV2.Protocol.HTTP,
            HealthyThresholdCount = 3,
            Path = "/health",
            Port = "80",
            Interval = Duration.Millis(10000),
            Timeout = Duration.Millis(8000),
            UnhealthyThresholdCount = 10,
            HealthyHttpCodes = "200"
        },
        Port = 80,
        Targets = new IApplicationLoadBalancerTarget[] { target }
    });
2. AWS WebSocket Api Gateway
In AWS API Gateway you can create a WebSocket API, which can be use as a stateful frontend for an AWS service or an HTTP endpoint.
The WebSocket API invokes your backend based on the content of the messages it receives from client apps.
I was unable to make a SignalR Core app work with AWS WebSocket Api Gateway.
The problem lies with how the API Gateway handles the connections and route messages. The API Gateway uses three predefined routes to communicate with the app: $connect, $disconnect, and $default.
- API Gateway calls the
$connectroute when a persistent connection between the client and a WebSocket API is being initiated. - API Gateway calls the
$disconnectroute when the client or the server disconnects from the API. - API Gateway calls the
$defaultroute if the route selection expression cannot be evaluated against the message or if no matching route is found.
This is a very specific way to handle connections and route messages and does not sit well with SignalR. In fact, it seems that integrating a SignalR Core app with an AWS WebSocket Api Gateway is not possible.
If someone knows a way to do it, contact me.
Backplane
A SignalR application needs to keep track of ALL connected clients, which creates a problem in an environment like AWS where applications can scale out automatically.
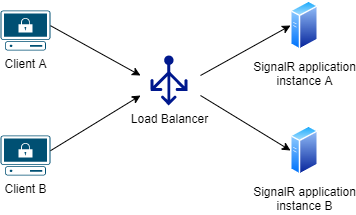
On the diagram below we have 2 instances of a SignalR Core application behind a load balancer. When client A interacts with the application it gets routed to instance A. When client B interacts with the application it gets routed to instance B.
In this scenario instance A is unaware of the connected clients on instance B, and viceversa, so if a client who is connected to instance A tries to broadcast a message, only the clients connected to instance A will receive the message.
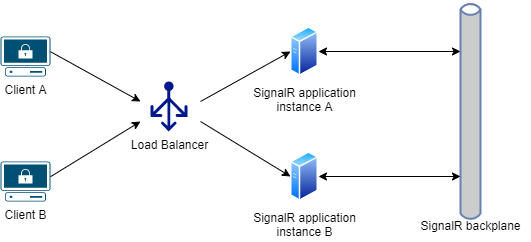
This is where a backplane becomes necessary. When a client makes a connection, the connection information is passed to the backplane. When a server wants to send a message to all clients, it sends it to the backplane. The backplane knows all connected clients and which servers they’re on.
In this section will review a few AWS services that can be used as a SignalR backplane, those services are the following ones:
- AWS ElastiCache for Redis.
- AWS MemoryDb.
- AWS RDS for SQL Server.
- Azure SignalR Service.
1. AWS ElastiCache for Redis
Amazon ElastiCache is a fully managed, in-memory caching service. You can use ElastiCache for caching or as a primary data store for use cases that don’t require durability like session stores, gaming leaderboards, streaming, and analytics. ElastiCache is compatible with Redis and Memcached.
Using Redis as a backplane is the recommended way for scaling-out SignalR Core apps hosted on AWS, and ElastiCache is probably the best fit.
How it works? The SignalR Redis backplane uses the Redis pub/sub feature to forward messages to other servers. When a client makes a connection, the connection information is passed to the backplane. When a server wants to send a message to all clients, it sends to the backplane. The backplane knows all connected clients and which servers they’re on. It sends the message to all clients via their respective servers.
How to configure the service
There is no extra configuration required on ElastiCache to make it work as a SignalR backplane.
How to configure the application
- Install the
Microsoft.AspNetCore.SignalR.StackExchangeRedisNuGet package. - In
ConfigureServicesinStartup.cs, configure SignalR with.AddStackExchangeRedis():
services
    .AddSignalR()
    .AddStackExchangeRedis("elasticache_redis_connection_string");
If you’re using a single ElastiCache server for multiple SignalR apps, use a different channel prefix for each app. Like this:
services
    .AddSignalR()
    .AddStackExchangeRedis("elasticache_redis_connection_string", opts => {
        opts.Configuration.ChannelPrefix = "ChatRoom";
    });
Setting a channel prefix isolates one SignalR app from others that use different channel prefixes.
If you don’t assign different prefixes, a message sent from one app to all of its own clients will go to all clients of all apps that use the Redis server as a backplane.
2. AWS MemoryDb
Amazon MemoryDB for Redis is a another Redis-compatible, in-memory database service that is based in part on the open source Redis platform.
What is the difference between MemoryDb or ElasticCache? Which one should I use?
The difference between Amazon ElastiCache and MemoryDB is that the former is intended as an in-memory cache that works alongside a primary database, whereas MemoryDB is a full database service in itself that is designed to operate on its own.
We could say that MemoryDB for Redis is AWS’s answer to Redis Enterprise and it exists to try to fill the gap for customers seeking a durable counterpart to ElastiCache. Consider Amazon MemoryDB, in essence, a premium tier of ElastiCache for Redis.
Both MemoryDb and ElastiCache supports the Redis pub/sub feature, so you can use both services as a SignalR backplane.
I tend to prefer ElastiCache over MemoryDb, for two reasons:
- ElastiCache is cheaper.
- The extra features that MemoryDb has over ElastiCache, like durability and persistence, are not really useful for a backplane.
How to configure the service
There is no extra configuration required on MemoryDb to make it work as a SignalR backplane.
How to configure the application
Go read the previous section where I talked about how to configure your application with a ElastiCache as a backplane, because the use is exactly the same for both services.
The only thing worth mentioning is that when creating a MemoryDb Cluster you have to set up authentication, meanwhile authentication on ElastiCache is optional, which means that when configuring your SignalR app to use MemoryDb as a backplane you’ll need to specify the user and password, like this:
services
    .AddSignalR()
    .AddStackExchangeRedis("memorydb_redis_connection_string", opts => {
        opts.Configuration.ChannelPrefix = "ChatRoom";
        opts.Configuration.User = "user1";
        opts.Configuration.Password = "pasword12345!";
        opts.Configuration.Ssl = true;
    });
3. Amazon RDS for SQL Server
Amazon RDS for SQL Server makes it easy to set up, operate, and scale SQL Servers in the cloud.
Using SQL Server as a backplane is not the right solution for applications with a need for very high throughput, or very high degrees of scale-out. Consider to use one of the Redis services (ElasticCache or MemoryDb) for such cases.
There is no official Microsoft implementation to use SQL Server as a backplane, if you want to use it you’ll need to use the IntelliTect.AspNetCore.SignalR.SqlServer NuGet package.
More info about this package here:
How to configure the service
There is no extra configuration required on RDS for SQL Server to make it work as a SignalR backplane.
How to configure the application
- Install the
IntelliTect.AspNetCore.SignalR.SqlServerNuGet package. - In
ConfigureServicesinStartup.cs, configure SignalR with.UseSqlServer():
Simple configuration:
services
    .AddSignalR()
    .AddSqlServer(Configuration.GetConnectionString("rds_sqlserver_connection_string"));
Advanced configuration:
services
    .AddSignalR()
    .AddSqlServer(o =>
    {
        o.ConnectionString = Configuration.GetConnectionString("rds_sqlserver_connection_string");
        // See above - attempts to enable Service Broker on the database at startup
        // if not already enabled. Default false, as this can hang if the database has other sessions.
        o.AutoEnableServiceBroker = true;
        // Every hub has its own message table(s).
        // This determines the part of the table named that is derived from the hub name.
        // IF THIS IS NOT UNIQUE AMONG ALL HUBS, YOUR HUBS WILL COLLIDE AND MESSAGES MIX.
        o.TableSlugGenerator = hubType => hubType.Name;
        // The number of tables per Hub to use. Adding a few extra could increase throughput
        // by reducing table contention, but all servers must agree on the number of tables used.
        // If you find that you need to increase this, it is probably a hint that you need to switch to Redis.
        o.TableCount = 1;
        // The SQL Server schema to use for the backing tables for this backplane.
        o.SchemaName = "SignalRCore";
    });
4. Azure SignalR Service
Azure SignalR Service is a managed SignalR backplane, it eliminates the need of having to manage your own Redis/SQL Server instance.
This services has a few advantages over the other backplane alternatives:
- Sticky sessions are not required, because clients are immediately redirected to the Azure SignalR Service when they connect.
- A SignalR app can scale out based on the number of messages sent, while the Azure SignalR Service scales to handle any number of connections. For example, there could be thousands of clients, but if only a few messages per second are sent, the SignalR app won’t need to scale out to multiple servers just to handle the connections themselves.
- A SignalR app won’t use significantly more connection resources than a web app without SignalR.
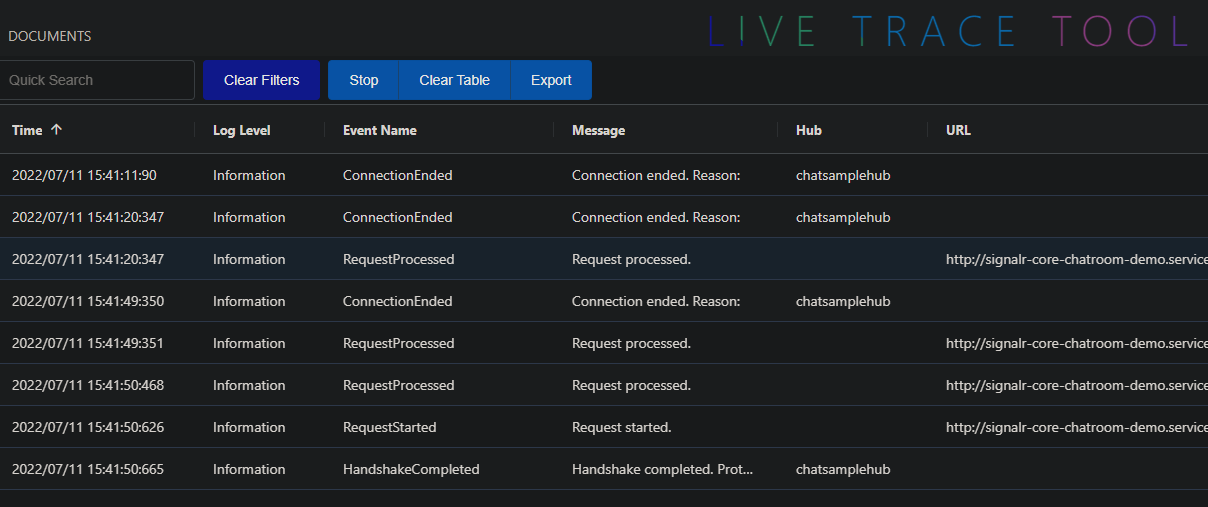
Another nice feature this service provides is the “Live Trace Tool”, it is is a single web application that exposes SignalR traces that went through the service.
The traces includes: connection connected/disconnected events and message received/left events.
Probably you’re asking yourself why I’m talking about an Azure service, that’s because you can use the Azure SignalR Service as a backplane with a SignalR Core app hosted in AWS as long as both: application and service are visible.
The optimal solution when choosing a backplane service is having the backplane as close as possible to the app, having the backplane on another cloud provider seems far from ideal, so if you want to use it be mindful about network latency, throughput and the amount of data that will be transferred outside of AWS.
How to configure the application
- Install the
Microsoft.Azure.SignalRNuGet package. - In
ConfigureServicesinStartup.cs, configure SignalR with.AddAzureSignalR():
Simple configuration:
services
    .AddSignalR()
    .AddAzureSignalR("azure_signalr_service_connection_string");
The AddAzureSignalR() method can be used without passing the “connection string” parameter, in this case it tries to use the default configuration key: Azure:SignalR:ConnectionString.
Advanced configuration:
services
    .AddSignalR()
    .AddAzureSignalR(o =>
    {
        options.ConnectionCount = 10;
        // This option controls the initial count of connections per hub between application
        // server and Azure SignalR Service. Usually keep it as the default value is enough.
        // During runtime, the SDK might start new server connections for performance tuning or
        // load balancing. When you have big number of clients, you can give it a larger number
        // for better throughput.
        options.AccessTokenLifetime = TimeSpan.FromDays(1);
        // This option controls the valid lifetime of the access token, which is generated by
        // Service SDK for each client. The access token is returned in the response to client's
        // negotiate request.
        options.ClaimsProvider = context => context.User.Claims;
        // This option controls what claims you want to associate with the client connection. It
        // will be used when Service SDK generates access token for client in client's negotiate
        // request. By default, all claims from HttpContext.User of the negotiate request will
        // be reserved. They can be accessed at Hub.Context.User.
        options.GracefulShutdown.Mode = GracefulShutdownMode.WaitForClientsClose;
        // This option specifies the behavior after the app server receives a SIGINT (CTRL + C).
        options.GracefulShutdown.Timeout = TimeSpan.FromSeconds(10);
        // This option specifies the longest time in waiting for clients to be closed/migrated.
    });
Compute
In the last section I want to talk about a few AWS services that can be used to deploy your SignalR Core application, those services are the following ones:
- AWS ECS
- AWS EC2
- AWS EKS
1. AWS ECS
Just build the container like any other .NET6 application and deploy it. No extra steps or configuration required here.
Just remember to enable sticky sessions on the ALB Target Group and to setup a proper backplane.
2. AWS EC2
The part where you deploy the SignalR app into the server is business as usual, it’s like deploying any kind of .NET6 application. On the other hand setting up the web server tends to be more problematic, so let’s talk a little bit about it.
Using a Windows EC2 with IIS as WebServer
- Enable WebSockets.
- You can do it in a single command using Powershell:
Enable-WindowsOptionalFeature -Online -FeatureName IIS-WebSockets.
- You can do it in a single command using Powershell:
- Sticky session should be set on the load balancer not in the WebServer.
Using a Linux EC2 with Apache as WebServer
- Create a VirtualHost configuration to enable WebServer communication. Like this:
<VirtualHost *:80>
    ProxyPass / ws://127.0.0.1:5000/
    ProxyPassReverse / ws://127.0.0.1:5000/
</VirtualHost>
127.0.0.1:5000 is the local address where the SignalR app is running.
If you set the VirtualHost configuration to use http instead of ws, like this:
<VirtualHost *:80>
    ProxyPass / http://127.0.0.1:5000/
    ProxyPassReverse / http://127.0.0.1:5000/
</VirtualHost>
It will use SSE (Server Sent Events) instead of WebSockets.
- Sticky session should be set on the load balancer not in the WebServer.
Using a Linux EC2 with NGINX as WebServer
- Create a new configuration on the “http” section. Like this one:
map $http_connection $connection_upgrade {
    "~*Upgrade" $http_connection;
    default keep-alive;
}
- Create a new “Location” configuration on the “server” section. Like this one:
location / {
    # App server url
    proxy_pass http://localhost:5000;

    # Configuration for WebSockets
    proxy_set_header Upgrade $http_upgrade;
    proxy_set_header Connection $connection_upgrade;
    proxy_cache off;
    # WebSockets were implemented after http/1.0
    proxy_http_version 1.1;

    # Configuration for ServerSentEvents
    proxy_buffering off;

    # Configuration for LongPolling or if your KeepAliveInterval is longer than 60 seconds
    proxy_read_timeout 100s;

    proxy_set_header Host $host;
    proxy_set_header X-Forwarded-For $proxy_add_x_forwarded_for;
    proxy_set_header X-Forwarded-Proto $scheme;
}
- Sticky session should be set on the load balancer not in the WebServer.
3. AWS EKS
Just build the container like any other .NET6 application and deploy it into the EKS cluster. No extra steps or configuration required here.
The tricky part here is configuring the Ingress Controller properly.
Using AWS Load Balancer Controller
AWS Load Balancer Controller is a controller that helps manage Elastic Load Balancers for a EKS cluster.
- It satisfies Kubernetes Ingress resources by provisioning Application Load Balancers.
- It satisfies Kubernetes Service resources by provisioning Network Load Balancers.
For our SignalR app we need to create an Ingress resource.
Here’s a quick explanation about how the AWS Load Balancer Controller creates and configures an ALB for us.
- The controller watches for ingress events from the API server. When it finds ingress resources that satisfy its requirements, it begins the creation of AWS resources.
- An ALB is created in AWS for the new ingress resource. This ALB can be internet-facing or internal. You can also specify the subnets it’s created in using annotations.
- Target Groups are created in AWS for each unique Kubernetes service described in the ingress resource.
- Listeners are created for every port detailed in your ingress resource annotations. When no port is specified, sensible defaults (80 or 443) are used. Certificates may also be attached via annotations.
- Rules are created for each path specified in your ingress resource. This ensures traffic to a specific path is routed to the correct Kubernetes Service.
I’m not going into further detail about how the AWS Load Balancer Controller works, because this is out of scope for this post, for a SignalR Core app the only thing you’ll need to know is that you need to add the alb.ingress.kubernetes.io/target-group-attributes metadata when the Ingress resource is created.
alb.ingress.kubernetes.io/target-group-attributesspecifies Target Group Attributes which should be applied to Target Groups.
Previously on the “Network” section, I talked about how you need to enable “sticky sessions” for a SignalR Core app to work properly with an ALB. Now, we’re going to use the alb.ingress.kubernetes.io/target-group-attributes metadata annotation to tell the AWS ALB Controller that when he creates the Target Group it needs to enable “sticky session”.
Like this:
alb.ingress.kubernetes.io/target-group-attributes: stickiness.enabled=true,stickiness.lb_cookie.duration_seconds=86400
For better understanding of how to setup the Ingress Resource, here’s an example of a Kubernetes manifest that contains an Ingress, a Service and a Deployment resource.
# Source: chat/templates/ingress.yaml
apiVersion: networking.k8s.io/v1
kind: Ingress
metadata:
  name: chat
  labels:
    helm.sh/chart: chat-0.1.0
    app.kubernetes.io/name: chat
    app.kubernetes.io/instance: chat
    app.kubernetes.io/version: "1.16.0"
    app.kubernetes.io/managed-by: Helm
  annotations:
    alb.ingress.kubernetes.io/scheme: internet-facing
    alb.ingress.kubernetes.io/target-group-attributes: stickiness.enabled=true,stickiness.lb_cookie.duration_seconds=86400
    alb.ingress.kubernetes.io/target-type: ip
    kubernetes.io/ingress.class: alb
spec:
  rules:
  - http:
      paths:
      - path: /
        pathType: Prefix
        backend:
          service:
            name: chat
            port:
              number: 80
---
# Source: chat/templates/service.yaml
apiVersion: v1
kind: Service
metadata:
  name: chat
  labels:
    helm.sh/chart: chat-0.1.0
    app.kubernetes.io/name: chat
    app.kubernetes.io/instance: chat
    app.kubernetes.io/version: "1.16.0"
    app.kubernetes.io/managed-by: Helm
spec:
  type: ClusterIP
  ports:
    - port: 80
      targetPort: http
      protocol: TCP
      name: http
  selector:
    app.kubernetes.io/name: chat
    app.kubernetes.io/instance: chat
---
# Source: chat/templates/deployment.yaml
apiVersion: apps/v1
kind: Deployment
metadata:
  name: chat
  labels:
    helm.sh/chart: chat-0.1.0
    app.kubernetes.io/name: chat
    app.kubernetes.io/instance: chat
    app.kubernetes.io/version: "1.16.0"
    app.kubernetes.io/managed-by: Helm
spec:
  replicas: 5
  selector:
    matchLabels:
      app.kubernetes.io/name: chat
      app.kubernetes.io/instance: chat
  template:
    metadata:
      labels:
        app.kubernetes.io/name: chat
        app.kubernetes.io/instance: chat
    spec:
      serviceAccountName: chat
      securityContext:
        {}
      containers:
        - name: chat
          securityContext:
            {}
          image: "242519123014.dkr.ecr.eu-west-1.amazonaws.com/signalr-chatroom:latest"
          imagePullPolicy: Always
          ports:
            - name: http
              containerPort: 80
              protocol: TCP
          livenessProbe:
            httpGet:
              path: /health
              port: http
          readinessProbe:
            httpGet:
              path: /health
              port: http
          resources:
            {}
I’m aware that there are other ways to consume a SignalR app that has been deployed into EKS, for example using a NGINX Ingress Controller, but I’m not going to talk about them in this section because I lack knowledge about them.
Example
On my GitHub account you can find a repository that contains a quick example about how to deploy a SignalR Core App on AWS.
The source code can be found here:
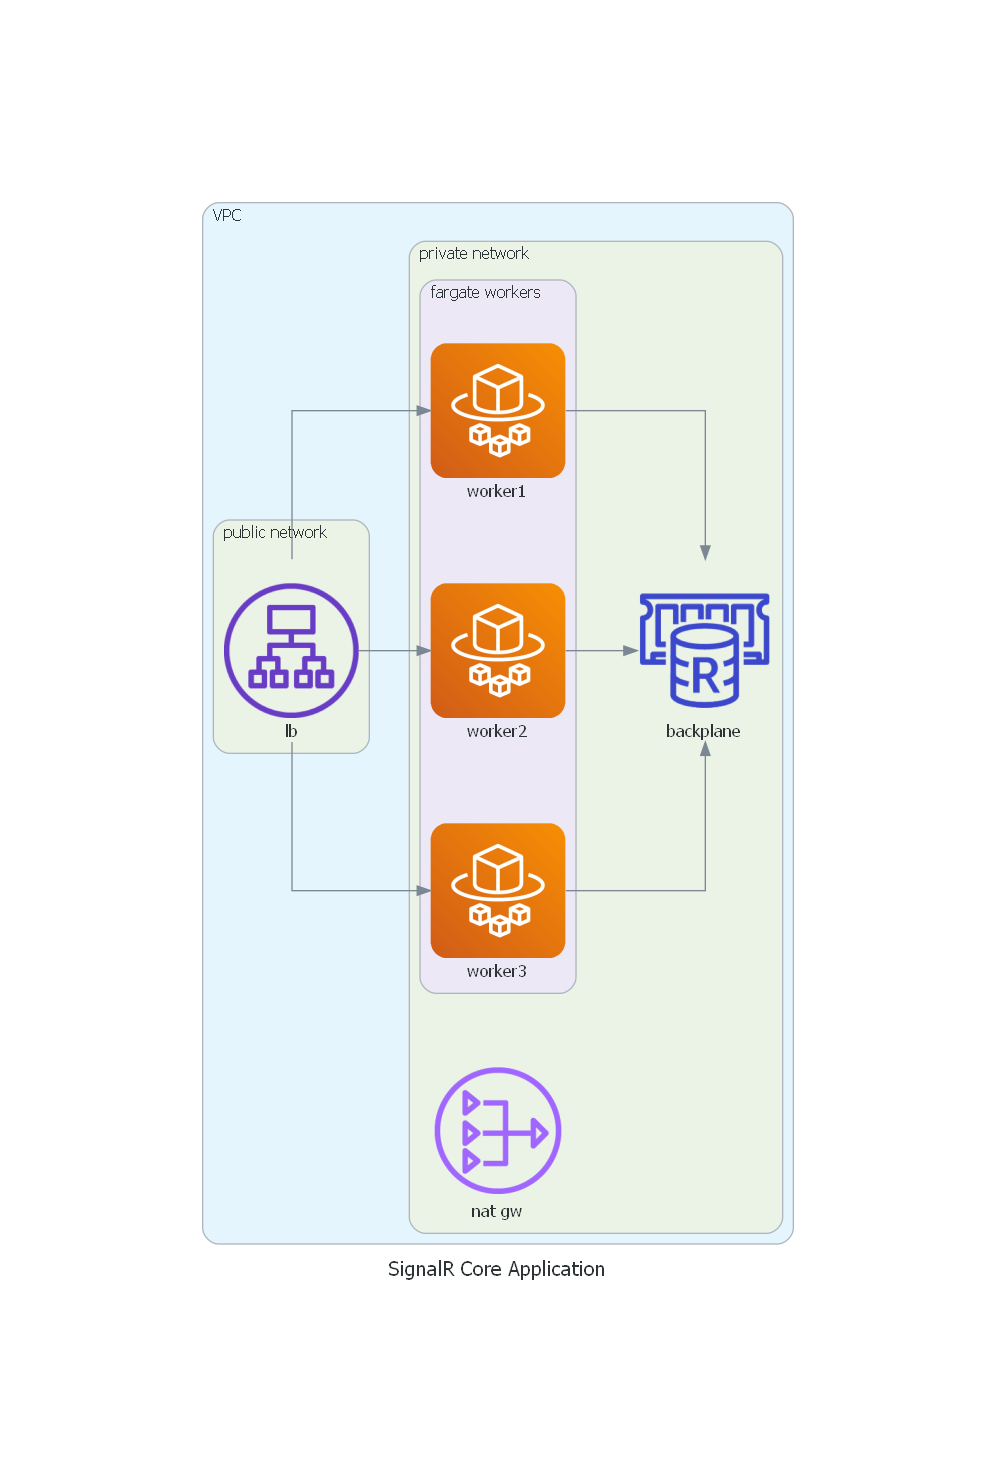
The repository contains a /cdk folder, where you can find a CDK app, that creates the following infrastructure on AWS:
- A VPC.
- An Application Load Balancer.
- A Fargate service.
- An ElasticCache instance.
- A NAT Gateway.