How to build a .NET template and use it within Visual Studio. Part 1: Key concepts
This is a 2 part-series.
- Part 1: Key concepts that you should know when creating a .NET template.
- Part 2: How to convert a few .NET apps into .NET templates, package them together in a single NuGet pack and use them as templates within Visual Studio. If you want to read it, click here
When you install the .NET SDK you receive a handful of built-in templates for creating projects like console apps, web apis, class libraries, unit test projects, etc.
But you can also create your own templates and install them using a NuGet package.
In fact packaging .NET templates inside a NuGet it’s nothing new, it’s been around for quite a long time.
Everytime you need to create a new app you have to setup a set of common features like: logging, documentation, healthchecks, authentication, dockerfiles, deployment pipelines, etc.
This is time consuming, boring and quite error prone, so a better approach is to convert your application into a template and reuse it everytime time that you need to scaffold a new one.
As I stated before, creating .NET templates and using NuGet to package them it’s nothing new. But then, why writing this post right now?
A few years ago the experience to create and package reusable .NET templates was pretty bare bones, but little by little the experience has been enhanced.
Nowadays if you want to develop a .NET template, the template engine offers features like:
- Replace values.
- Include and exclude files.
- Preprocessor conditional directives to include or exclude entire blocks of code.
- Execute custom operations when your template is used.
Also a couple of weeks ago Microsoft anounced the release of Visual Studio 2019 version 16.10. This version adds the capability of creating entire solutions from a .NET template.
Nowadays the developer experience when you want to develop a template is quite fleshed out, so I thought it might be a good moment to write a full recap about how you can create and use a .NET template.
So in this series I will try to explain the process of converting a few .NET applications in templates, package them in a single NuGet package and use it as templates within Visual Studio.
But first of all, let’s talk about some key concepts that I think are worth mentioning.
1. Key Concepts
1.1. .template.config folder
Templates are recognized by a special folder that exist at the root of your template. This folder needs to be specifically named: .template.config
When you create a new project using a custom template all files and folders are copied as part of the template except for the .template.config folder.
In a single NuGet you can add multiple templates, but each template needs to have a .template.config folder at its root level. Within the NuGet package all the templates must be stored in the /content folder.
Here’s how the folder structure should look like:
---content
    +---TemplateA
    |   +---.template.config
    |   +---src
    |   \---test
    +---TemplateB
    |   +---.template.config
    |   +---src
    |   \---test
    \---TemplateC
        +---.template.config
        +---src
        \---test
In this example the /content folder contains 3 templates and each template contains a .template.config folder.
Inside the .template.config folder you need to place at least a file named template.json
The template.json file provides information about what the template engine should do with your template.
Here’s a brief example about how a template.json file looks like:
{
  "$schema": "http://json.schemastore.org/template",
  "author": "mytechramblings.com",
  "classifications": [
    "Cloud",
    "Service",
    "Web"
  ],
  "name": "Azure Function with Timer and NET Core 3.1",
  "description": "An Azure Function trigger by a timer and built using NET Core 3.1",
  "groupIdentity": "Dotnet.Function.Timer",
  "identity": "Dotnet.Function.Timer.CSharp",
  "shortName": "mtr-az-func-timer",
  "defaultName": "TimerFunction1",
  "tags": {
    "language": "C#",
    "type": "project"
  },
  "sourceName": "ApplicationName",
  "symbols": {
    "FunctionName": {
        "type": "parameter",
        "datatype": "string",
        "defaultValue": "MyFunction",
        "replaces": "FUNCTION-NAME",
        "description": "The name of the Azure Function."
    },
    "CronExpression": {
        "type": "parameter",
        "datatype": "string",
        "defaultValue": "0 * * * * *",
        "replaces": "CRON-TIMER",
        "description": "The timer expression in cron expression."
    },
    "LogLevel": {
        "type": "parameter",
        "datatype": "string",
        "defaultValue": "Information",
        "replaces": "LOG-LEVEL",
        "description": "Default LogLevel for the Azure Function."
    },
  }
}
I will walk you through a complex template.json file on part 2, but for now you just need to know that every template needs to have a corresponding template.json file.
If you don’t want to wait for part 2 take a look at this page, it describes quite in-depth the different attributes you can use in the
template.json. https://github.com/dotnet/templating/wiki/Reference-for-template.json
1.2. Packaging your templates into a nuget package
There are a couple of ways of packaging your templates:
- Using a
.csprojfile and thedotnet packcommand. - Using a
.nuspecfile and thenuget packcommand fromnuget.exe.
If you use the .csproj file approach you need to know that the .csproj is slightly different from a traditional code-project .csproj file. Here’s an example:
<Project Sdk="Microsoft.NET.Sdk">

  <PropertyGroup>
    <PackageType>Template</PackageType>
    <PackageVersion>1.0.0</PackageVersion>
    <PackageId>MyTechRamblings.Templates</PackageId>
    <Title>>MyTechRamblings Dotnet Templates</Title>
    <Authors>MyTechRamblings</Authors>
    <Description>Templates to use when creating an application</Description>
    <PackageTags>dotnet;templates;foo</PackageTags>
    <TargetFramework>netstandard2.0</TargetFramework>

    <IncludeContentInPack>true</IncludeContentInPack>
    <IncludeBuildOutput>false</IncludeBuildOutput>
    <ContentTargetFolders>content</ContentTargetFolders>
  </PropertyGroup>

  <ItemGroup>
    <Content Include="src\**\*" Exclude="src\**\bin\**;src\**\obj\**" />
    <Compile Remove="**\*" />
  </ItemGroup>
</Project>
Note the following settings:
- The
<PackageType>setting is added and set toTemplate. - The
<PackageVersion>setting is added and set to a valid NuGet version number. - The
<PackageId>setting is added and set to a unique identifier. This identifier is used to install and uninstall the template package. - The
<TargetFramework>setting must be set, even though the binary produced by the template process isn’t used. In the example below it’s set to netstandard2.0. - The
<IncludeContentInPack>setting is set to true to include any file the project sets as content in the NuGet package. - The
<IncludeBuildOutput>setting is set to false to exclude all binaries generated by the compiler from the NuGet package. - The
<ContentTargetFolders>setting is set to content. This makes sure that the files set as content are stored in the content folder in the NuGet package. The/contentfolder is the one parsed by the template engine.
If you use the .nuspec file approach, the current nuspec.xsd schema file can be found here
Here’s an example:
<?xml version="1.0" encoding="utf-8"?>
<package>
  <metadata>
    <id>MyTechRamblings.Templates</id>
    <version>1.0.0</version>
    <description>Templates to use when creating an application</description>
    <authors>MyTechRambligns</authors>
    <title>>MyTechRamblings Dotnet Templates</title>
    <requireLicenseAcceptance>false</requireLicenseAcceptance>
    <license type="expression">MIT</license>
    <tags>dotnet templates foo</tags>
    <language>en-US</language>
	  <packageTypes>
      <packageType name="Template" />
    </packageTypes>
  </metadata>
  <files>
    <file src="**" exclude="**\bin\**\*;**\obj\**\*;**\*.user;**\*.lock.json;_rels\**\*;package\**\*" />
  </files>
</package>
- The
<id>setting is added and set to a unique identifier. This identifier is used to install and uninstall the template package. - The
<version>needs to be set to a valid NuGet version number. - The
<packageType>setting needs to be set toTemplate. - The
<files>setting is excluding all binaries generated by the compiler from the NuGet package.
1.3. Installing the templates package
Template packages are represented by a NuGet package (.nupkg) file.
Like any NuGet package, you can upload the template pack to a NuGet feed. The dotnet new -i command supports installing the template package from a NuGet feed and from your local file system.
- To install a template from a NuGet package stored at nuget.org:
dotnet new -i <NUGET_PACKAGE_ID>
- To install a template from a file system directory:
dotnet new -i <FILE_SYSTEM_NUPKG_PATH>
- To uninstall a template:
dotnet new -u <NUGET_PACKAGE_ID>
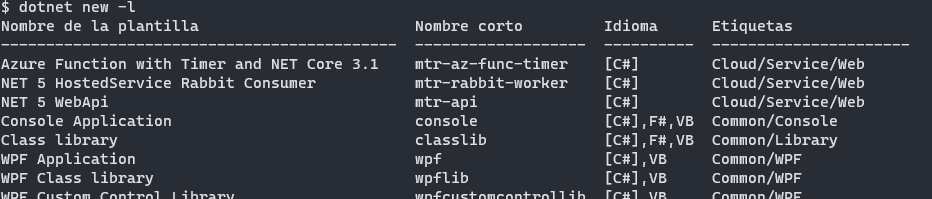
- To check if you template has been installed successfully:
dotnet new -l
The dotnet new -l command will list all the templates you have installed in your machine. If your custom template has been installed successfully it will show up there.
1.4. Using your templates with the .NET CLI
Once you have installed your templates you can start creating new projects (or new solutions) with them using the dotnet new <TEMPLATE_NAME> command.
If your template needs some command line parameters you can customize them by adding a dotnetcli.host.json file inside the .template.config folder.
In the dotnetcli.host.json file you can specify the short and long names for each of the command line parameters.
Here’s an example:
{
    "$schema": "http://json.schemastore.org/dotnetcli.host",
    "symbolInfo": {
        "FunctionName": {
            "longName": "function-name",
            "shortName": "fn"
        },
        "LogLevel": {
            "longName": "log-level",
            "shortName": "log"
        },
        "CronExpression": {
            "longName": "cron-job",
            "shortName": "cr"
        }
    }
}
With this concrete dotnetcli.host.json file put in place you can create a new project running the following commands:
dotnet new <TEMPLATE_NAME> -fn "MyFunc" -log "Debug" -cr "0 * * * *"
dotnet new <TEMPLATE_NAME> --function-name "MyFunc" --log-level "Debug" --cron-job "0 * * * *"
Both commands will output exactly the same result.
The dotnetcli.host.json it’s not mandatory, but if you don’t use it then the template engine will pick the command line names for you.
Quick tip: The name of the objects being placed inside the symbolInfo object: FunctionName, LogLevel and CronExpression must match the names found inside the symbols object from the template.json.
1.6. Configure your templates to work with Visual Studio
If your template needs some command line parameters you need to create a file named ide.host.json and place it inside the .template.config folder.
This file will be used to show the command line parameters inside a project dialog within the Visual Studio when you try to create a new project.
Here’s a brief example:
{
    "$schema": "http://json.schemastore.org/vs-2017.3.host",
    "order": 0,
    "icon": "icon.png",
    "symbolInfo": [
      {
        "id": "FunctionName",
        "name":
        {
          "text": "The name of the Azure Function."
        },
        "isVisible": true
      },
      {
        "id": "LogLevel",
        "name":
        {
          "text": "Default LogLevel for the Azure Function."
        },
        "isVisible": true
      },
      {
        "id": "CronExpression",
        "name":
        {
          "text": "The timer expression in cron expression."
        },
        "isVisible": true
      },
    ]
}
- The
orderattribute is used to specify the order of the template in theVisual Studio New Projectdialog. - You can customize your templates appearance in the template list with an icon. If it is not provided, a default icon will be associated with your project template.
To add your own icon you just need to put anicon.pngfile inside the.template.confgfolder. - The
symbolInfoarray contains all the command line parameters that we want to render inside the Visual Studio dialog. - The
symbolInfo.isVisibleproperty enables the parameter visibility. The default value of theisVisibleproperty isfalse. You need to change it totrueor is not going to show in the Visual Studio dialog.
Quick tip: The id attribute of the objects being placed inside the symbolInfo array: FunctionName, LogLevel and CronExpression must match the names found inside the symbols object from the template.json.
1.6. Using your templates within Visual Studio
- This feature is only available in Visual Studio version 16.8 or higher.
- If you’re creating a solution template you need at least Visual Studio version 16.10 or higher.
Right now there is no way to install a template package within Visual Studio, to install them on your machine you need to do it using the .NET CLI. More info about how you can do it on section 1.3.
After you have installed the templates via .NET CLI you need to enable the use of templates within Visual Studio.
To enable this option visit the Preview Features options in the Tools > Options menu and look for the Show all .NET Core templates in the New Project dialog checkbox.
After enabling this option if you choose to create a new project you’ll see your custom templates in the list of available templates.
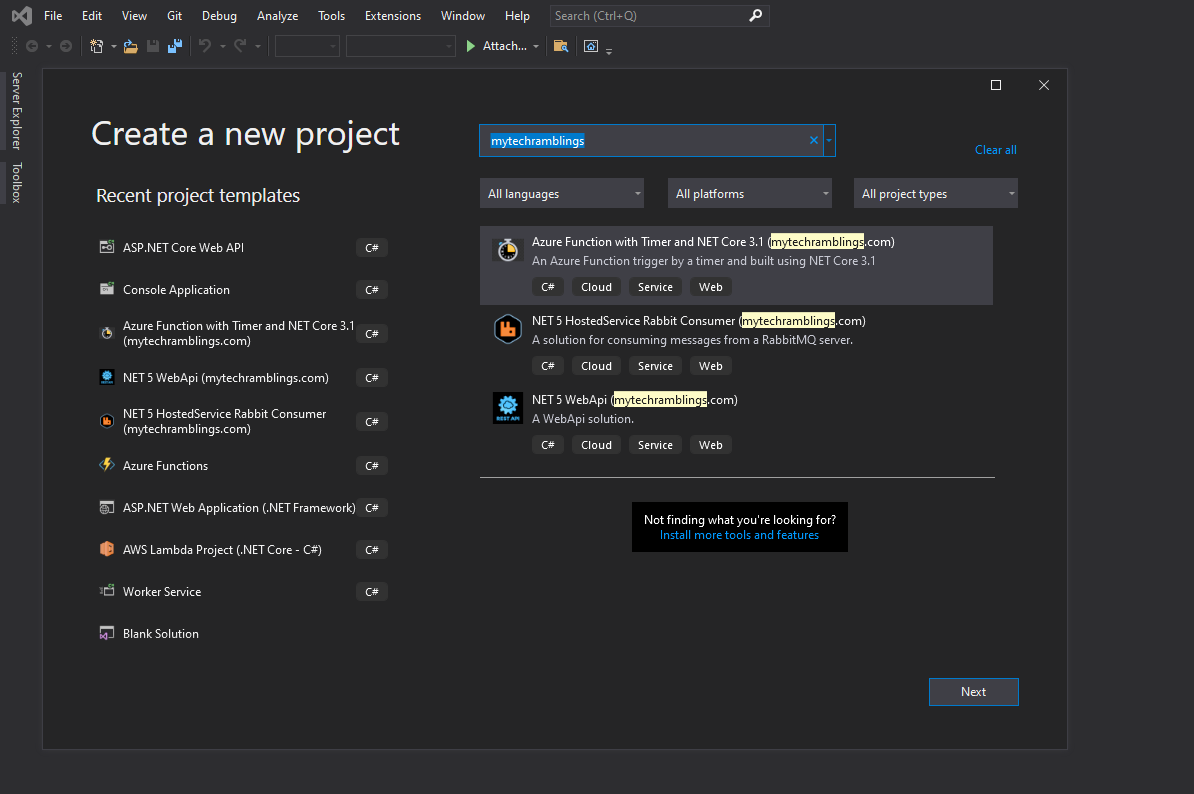
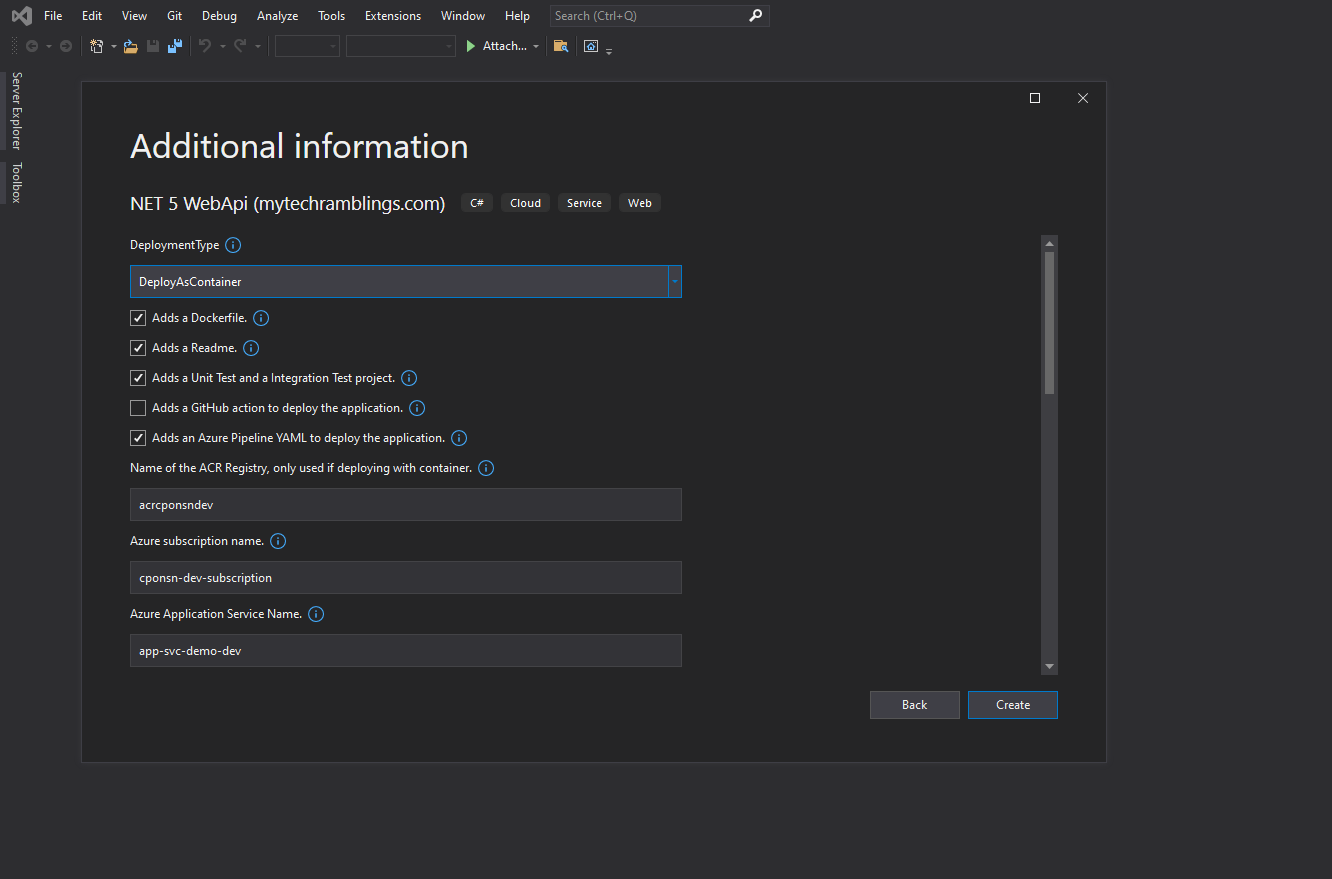
If you try to create a new project using your custom template a dialog will show up with all the command line parameters you set previously in the ide.host.json file.
Here’s an example about how it looks:
I think it’s enough theory for now and I have covered the basic concepts you need to know when building a template.
In the next section I will show you how to convert some apps into .NET templates, but it won’t be right now. See you in part 2